A Step-by-Step Guide to Crafting an Engaging Video Introduction
A Step-by-Step Guide to Crafting an Engaging Video Introduction
7 minutes for reading
Introduction
Welcome to the essential guide on creating an impactful video introduction for your Tutorpeers profile! In online tutoring, a video introduction is more than just a friendly hello; it's a powerful tool that can significantly increase your chances of attracting students. This short clip is your opportunity to showcase your personality, professionalism, and passion for teaching. It helps students understand who you are and what you bring to the table as a tutor. In this guide, we'll walk you through the steps to craft a video that captures your essence as an educator and resonates with potential students, enhancing your profile’s appeal and boosting your bookings. Let's dive in and help you create a video introduction that stands out!
Preparing Your Script
Your video introduction is your chance to speak directly to potential students and their parents, making a script is essential for delivering a clear and engaging message. Here's how to prepare it:
Using Your 'About' Section as a Foundation: If your 'About' section is already aligned with our guidelines, it's a great starting point for your script. A well-crafted 'About' section can be a natural and authentic script for your video. It ensures consistency in your profile and offers a personal glimpse into your teaching world.
Key Elements to Include:
Introduction: Start with a friendly introduction. Mention your name and any relevant personal details that you’re comfortable sharing.
Specialization: Mention your areas of expertise, particularly those you are most confident about.
Teaching Style: Describe your teaching style and approach. This helps students understand how you conduct your sessions.
Qualifications and Experience: Briefly discuss your qualifications, teaching experience, and special achievements or recognitions.
Staying Concise: With a maximum duration of 3 minutes for the video, it’s important to be concise. Plan your script to cover all the essential points within this timeframe. Practice delivering your script a few times to ensure it fits comfortably within the time limit, keeping your delivery natural and engaging.
Setting Up Your Recording Space
The space where you record your video introduction is crucial in how professional and engaging your video appears. Here are some tips to set up an ideal recording space:
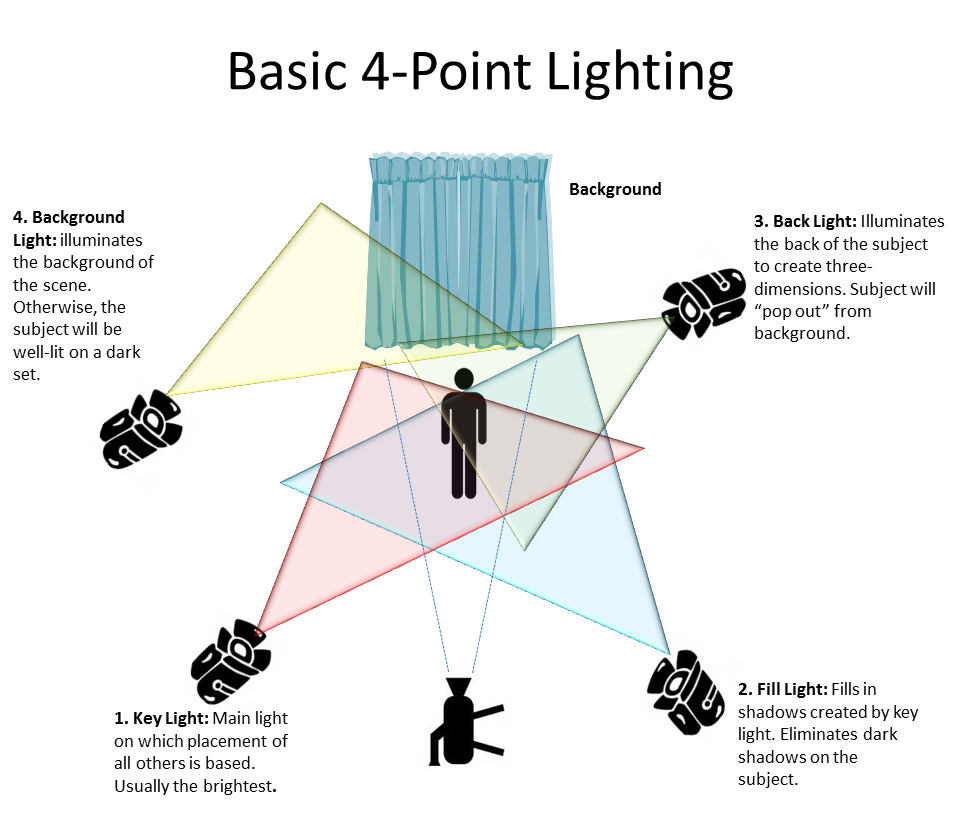
Choosing a Quiet, Well-Lit Area: Select a location where you won’t be interrupted or distracted. Your voice must be clear and audible without background noise. Natural lighting can be your best ally; try to record in a room with plenty of natural light or sit facing a window. This provides a soft, flattering light that enhances video quality.
Optimizing Lighting: If natural light isn’t sufficient, consider using additional light sources. A simple desk lamp can make a significant difference. The key is to avoid harsh shadows or overly bright spots. Aim for even, soft lighting on your face. Good lighting can also be useful during tutoring sessions.
Background Matters: The background of your video should be clean and uncluttered. It doesn’t have to be bare, but it should be tidy and professional-looking. A bookshelf with some books, a neat workspace, or a plain wall can be a good backdrop. Avoid having windows or bright light sources behind you, which can cause backlighting and make you appear silhouetted.
General Aesthetics: The overall aesthetics of your recording space should reflect the professionalism you want to convey. A little effort in setting up an appealing background can go a long way in making your video more inviting.
Filming Tips
Now that your script is ready and your recording space is set, it's time to focus on filming your video introduction. Here are some tips to help you capture the best footage:
Using the Rear Camera: If you’re filming with a smartphone, consider using the rear camera instead of the front-facing one. The rear camera typically offers higher resolution and better quality, making your video look more professional.
Framing and Positioning: Position yourself so that you are in the center of the frame, with your head and shoulders visible. This is known as a medium close-up shot and is ideal for speaking directly to the camera. Make sure there’s a little space above your head in the frame to avoid looking cramped.
Stable Recording: Use a stable surface or tripod to mount your phone or camera to avoid shaky video. If you don’t have a tripod, you can improvise with a stack of books or a stable shelf.
Eye Contact and Body Language: Maintain eye contact with the camera lens, as this creates a sense of connection with the viewer. Be mindful of your body language; a natural, relaxed posture conveys confidence and approachability.
Practicing Before Recording: Do a couple of practice runs to get comfortable with your script and the camera. This helps in smoothing out any nervousness and ensures your delivery is natural and confident.
Sound Quality: Ensure your voice is clear and audible. If you’re using a smartphone, the built-in microphone usually suffices in a quiet room. However, if you’re in a noisier environment, consider using an external microphone.
Technical Specifications
While creating your video introduction, it’s important to adhere to the technical specifications set by Tutorpeers to ensure your video is successfully uploaded to your profile.
Max Video Size and Duration: Keep in mind that your video should not exceed 50 MB in file size and should be no longer than 3 minutes. These limitations are in place to ensure quick and smooth uploads and viewing experiences for students.
Checking Video Quality and File Size: After filming your video, check the quality and file size. If the video exceeds 50 MB, consider compressing it or reducing the resolution. There are various free tools available online that can help you with this.
Format and Compatibility: Ensure that your video is in a format compatible with the Tutorpeers platform. We support formats like WebM, QuickTime, MPEG-4, Matroska, mp4, avi, mov, wmv, mp3, wav, aac.
Testing Before Uploading: It’s a good practice to watch your video in full before uploading it to catch any issues with audio or video quality. This step ensures that your final upload is exactly as you intend it to be.
Finalizing and Uploading Your Video
Once you have filmed your video introduction, the next steps are finalizing and uploading it to your Tutorpeers profile. This is where you make sure your video is polished and ready for your audience.
Reviewing Your Video: Take the time to review your video. Check for clarity, sound quality, lighting, and overall presentation. Make sure it conveys the message you intended and reflects your professionalism as a tutor.
Editing if Necessary: If you notice any minor issues, such as long pauses or slight missteps in speech, consider editing the video. There are many user-friendly video editing tools available that can help you trim or tidy up your video. Remember, the goal is to keep it authentic, so minor imperfections that don’t distract from the message can be left as is.
Uploading to Your Profile: Once you’re satisfied with your video, it’s time to upload it to your Tutorpeers profile. Navigate to the appropriate section of your profile for video uploads and follow the prompts to upload your file. Ensure that the video uploads completely and is playable from your profile.
Checking After Uploading: After uploading, check your profile to ensure the video appears as expected. This is your final quality check to ensure everything is in order and that potential students can view your introduction without any issues.
Conclusion
Creating a video introduction for your Tutorpeers profile is an excellent opportunity to connect with potential students on a more personal level. This short video can significantly enhance your profile’s appeal, allowing students to see your enthusiasm, hear your communication style, and feel more confident in choosing you as their tutor.
Remember, the key to a successful video introduction lies in being authentic and professional. Use your ‘About’ section as a script guideline, ensure good lighting and a clear background, and adhere to the technical specifications. With these tips in mind, you're well on your way to crafting a video that not only showcases your skills and personality but also resonates with your audience, potentially increasing your bookings on Tutorpeers.
We look forward to seeing how your video introductions bring your profiles to life and create deeper connections with your students. Happy filming!
Q&A
Q: What are the key elements to include in a Tutorpeers video introduction?
A: In a Tutorpeers video introduction, include a friendly introduction with your name, your areas of expertise, your teaching style and approach, qualifications and experience, and a concise message that fits within a 3-minute duration.
Q: How can I ensure good lighting for my video introduction?
A: Use natural lighting where possible or additional light sources to avoid harsh shadows. Ensure the lighting is even and soft on your face, enhancing video quality.
Q: What are the best practices for filming a professional video introduction?
A: Use the rear camera of a smartphone for better quality, frame yourself in a medium close-up shot, use a stable surface or tripod, maintain eye contact with the camera, practice your script for a natural delivery, and ensure clear sound quality.
Q: What technical specifications should I consider for my Tutorpeers video introduction?
A: Your video should not exceed 50 MB and should be no longer than 3 minutes. It should be in a compatible format like mp4 or avi. Ensure the video quality and file size are suitable before uploading.
Learn how to establish routines, encourage reading, communicate effectively with teachers, and more, all while fostering independence and confidence in your child. Dive into this essential resource and start making a tangible difference in your child's education today!
Unlock the full potential of Tutorpeers with our guide: Filter effectively, decode tutor profiles, and ask the right questions for a tailored tutoring experience.